Table of Contents
QUICK START
Welcome to QuoVadis X Mobile. We recommend to read this short chapter first to get a quick overview of how QuoVadis X Mobile, in short QVXM, works.
System requirements
QVXM runs on all iPhones and iPads with iOS/iPadOS 10.3 at least. On Android devices at least Android 7 is required. However, there are some more points to consider.
- Screen size: we recommend a screen size of at least 5.5 inches to have enough space for the split screen with the map and tasks, the bigger the better.
- Free storage space: the app requires 200 MB of storage space. It is enough for all tasks as long as you use only online maps and routing. If you want to use offline maps and offline routing, you have to download them first, therefore more space is required, some countries up to several GB.
We recommend to test the free trial to verify that everything runs fine on your specific device before purchasing a subscription.
Licenses
QVXM is available in three versions. The free Basic and the Standard and Poweruser subscriptions. Please refer to the chapter Manage my License how to activate the version of your choice.
Test before buying
AFTER DOWNLOADING THE APP, YOU WILL HAVE 10 DAYS TO TEST THE FULL FUNCTIONALITY FREE OF CHARGE. WE RECOMMEND YOU TO TAKE YOUR TIME TO TEST THE APP IF IT SUITS YOUR EXPECTATIONS BEFORE YOU GO FOR A SUBSCRIPTION.
Support
QVXM is designed to be intuitive and easy to learn. This Quick Start will help you to learn the first steps.
Free support is available on our Facebook page and Support Forum.
Additionally there is a personal support package available on the subscription base. With this package you receive personal support via email. Note that this package is OPTIONAL, you can find full information about all app functionality from the manual or on QV support pages free of charge.
The concept of QuoVadis X
The concept of QuoVadis X, Mobile and Desktop, is to give powerful tools and important travel relevant information to plan, navigate and also archive tours. QuoVadis X is not offering ready tours, but makes it easy to create the best tour for you.
Main component
Three main components are:
- Maps - you can choose which maps you want to use; the most common online maps like OpenStreetMap, Google, Bing are included, offline maps can be downloaded, own maps can be imported from QVX Desktop.
- Waypoints, Routes, Tracks - create, maintain and use unlimited Waypoints, Routes and Tracks. They are stored in the Database, can be loaded when needed into the map and unloaded when not needed any more.
- POIs - search for POIs, add them into the map, use them for route planning and navigation.
In QVX we created Tasks for all these individual steps. The Tasks are arranged in the split screen, half map, half task, so that you always see the result of the task in the map.
This is the typical workflow to plan a tour or to navigate somewhere:
- Load a map of your choice with Maps task.
- Load the routes, waypoints and tracks you need into the map with Show in map
 check box.
 - Optionally add POIs to the map with POI task.
- Start planning a new route with Route planning task.
- Go riding, walking or driving with Navigate.
Visibility
A very important part of the concept is visibility of routes, waypoints and tracks. They are stored in the database and will stay there until they are deleted with Delete-command in Properties. When you need some of them for a tour, you make them appear in the map by checking the Show in map  check box. When you don't need them any more in the map, just uncheck the Show in map
  check box. They will disappear from the map, but still remain in the database. So at any time you can load them back into the map.
There is the third option where you can quickly hide them for a better overview, see Project manager task.
check box. They will disappear from the map, but still remain in the database. So at any time you can load them back into the map.
There is the third option where you can quickly hide them for a better overview, see Project manager task.
Offline
QVX offers maps and routing for offline use when there is no connection. Please refer to chapter Downloads for more information.
User Interface
The user interface consists of a full screen map and several buttons.
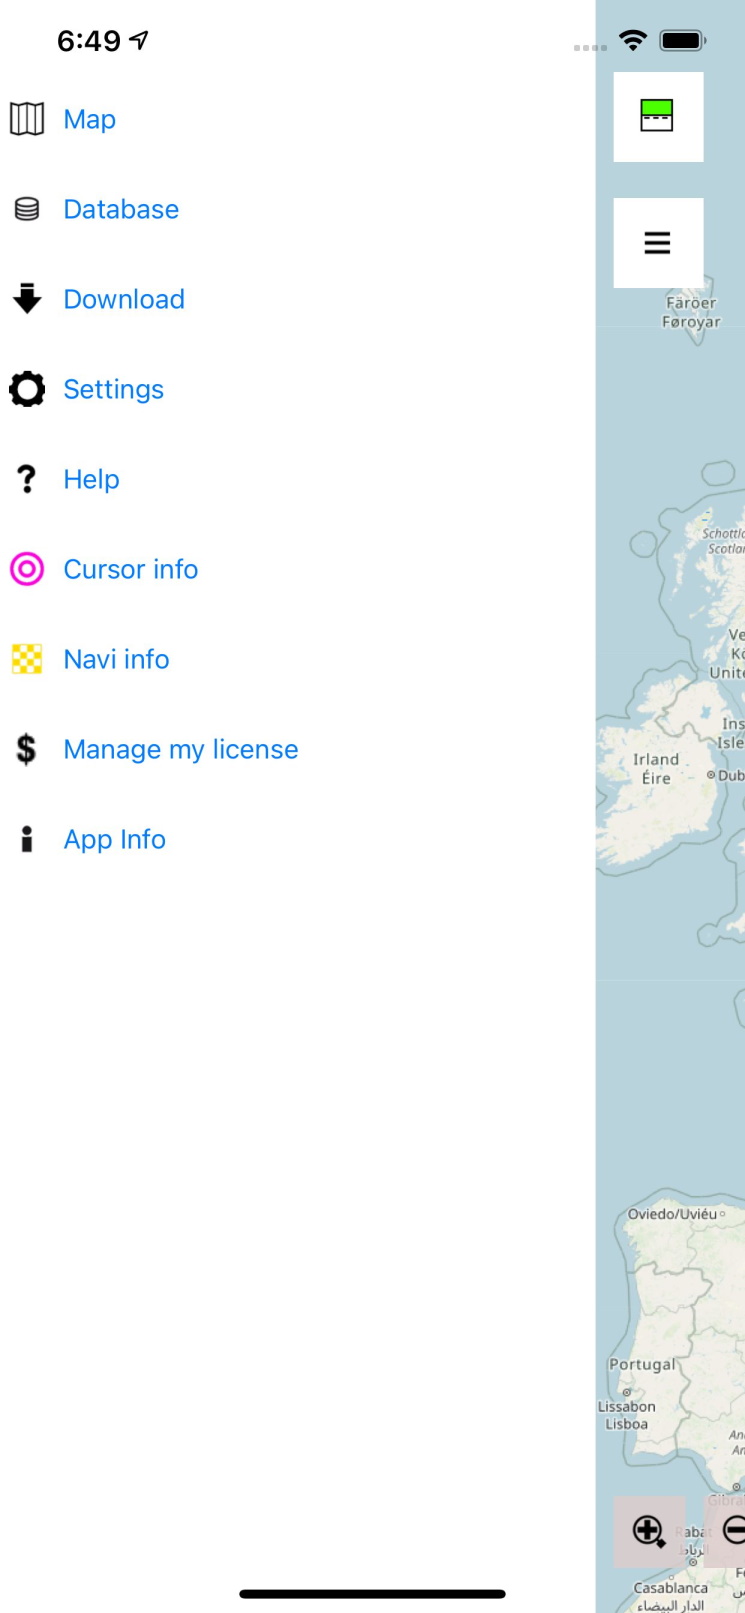
The top left Main menu  button opens a menu on the left with functions which do not require the map at the same time:
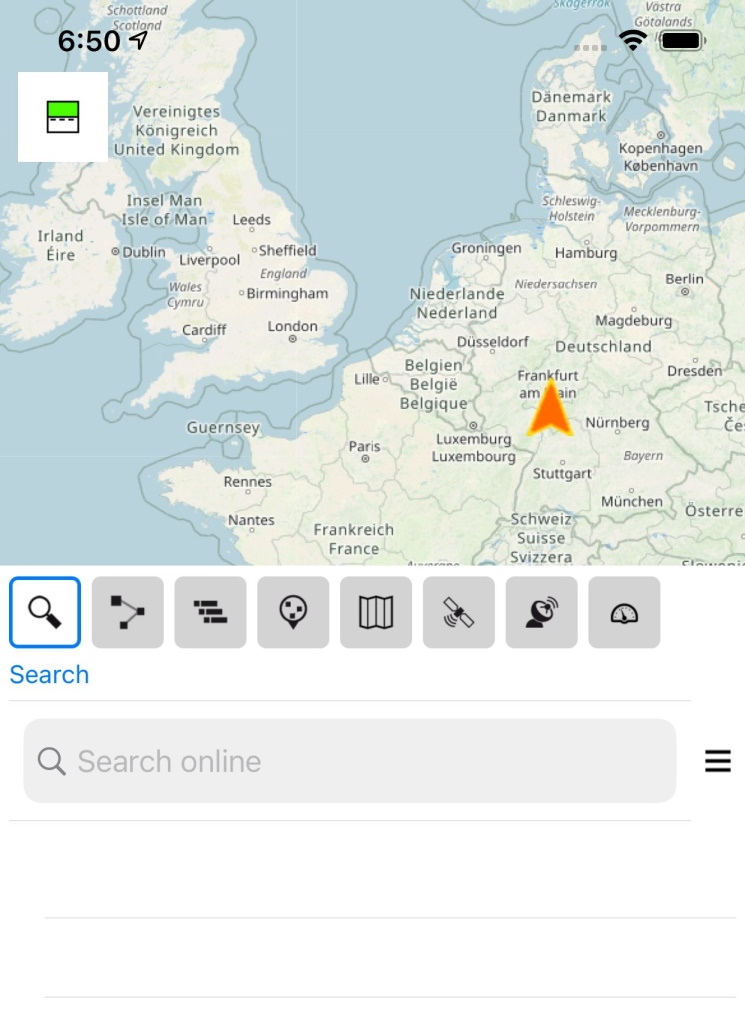
and Task slider  button opens the menu at the bottom in a split screen leaving half of the map visible and active. There you have access to different tasks, like Search task, Map task, Route planning task etc. We will explain these tasks in detail further down. Tap again on Task slider button to close it, or swipe the task slider down.
Map
The map is shown full screen. It can be scrolled just by tapping on the screen and moving it to the desired direction. It can be zoomed either with the pinch gesture or with Zoom 
 buttons.
You can change the map or even load multiple maps in the Maps task. The map can contain Waypoints, Routes, Tracks and POIs. Each of these elements can be tapped to open a specific menu which leads to a specific task like Properties, Add to Route, Directions etc.
Waypoints, Routes, Tracks are loaded into the map by checking the Show in map check box, and unloaded by unchecking the checkbox.
All these tasks are explained below.
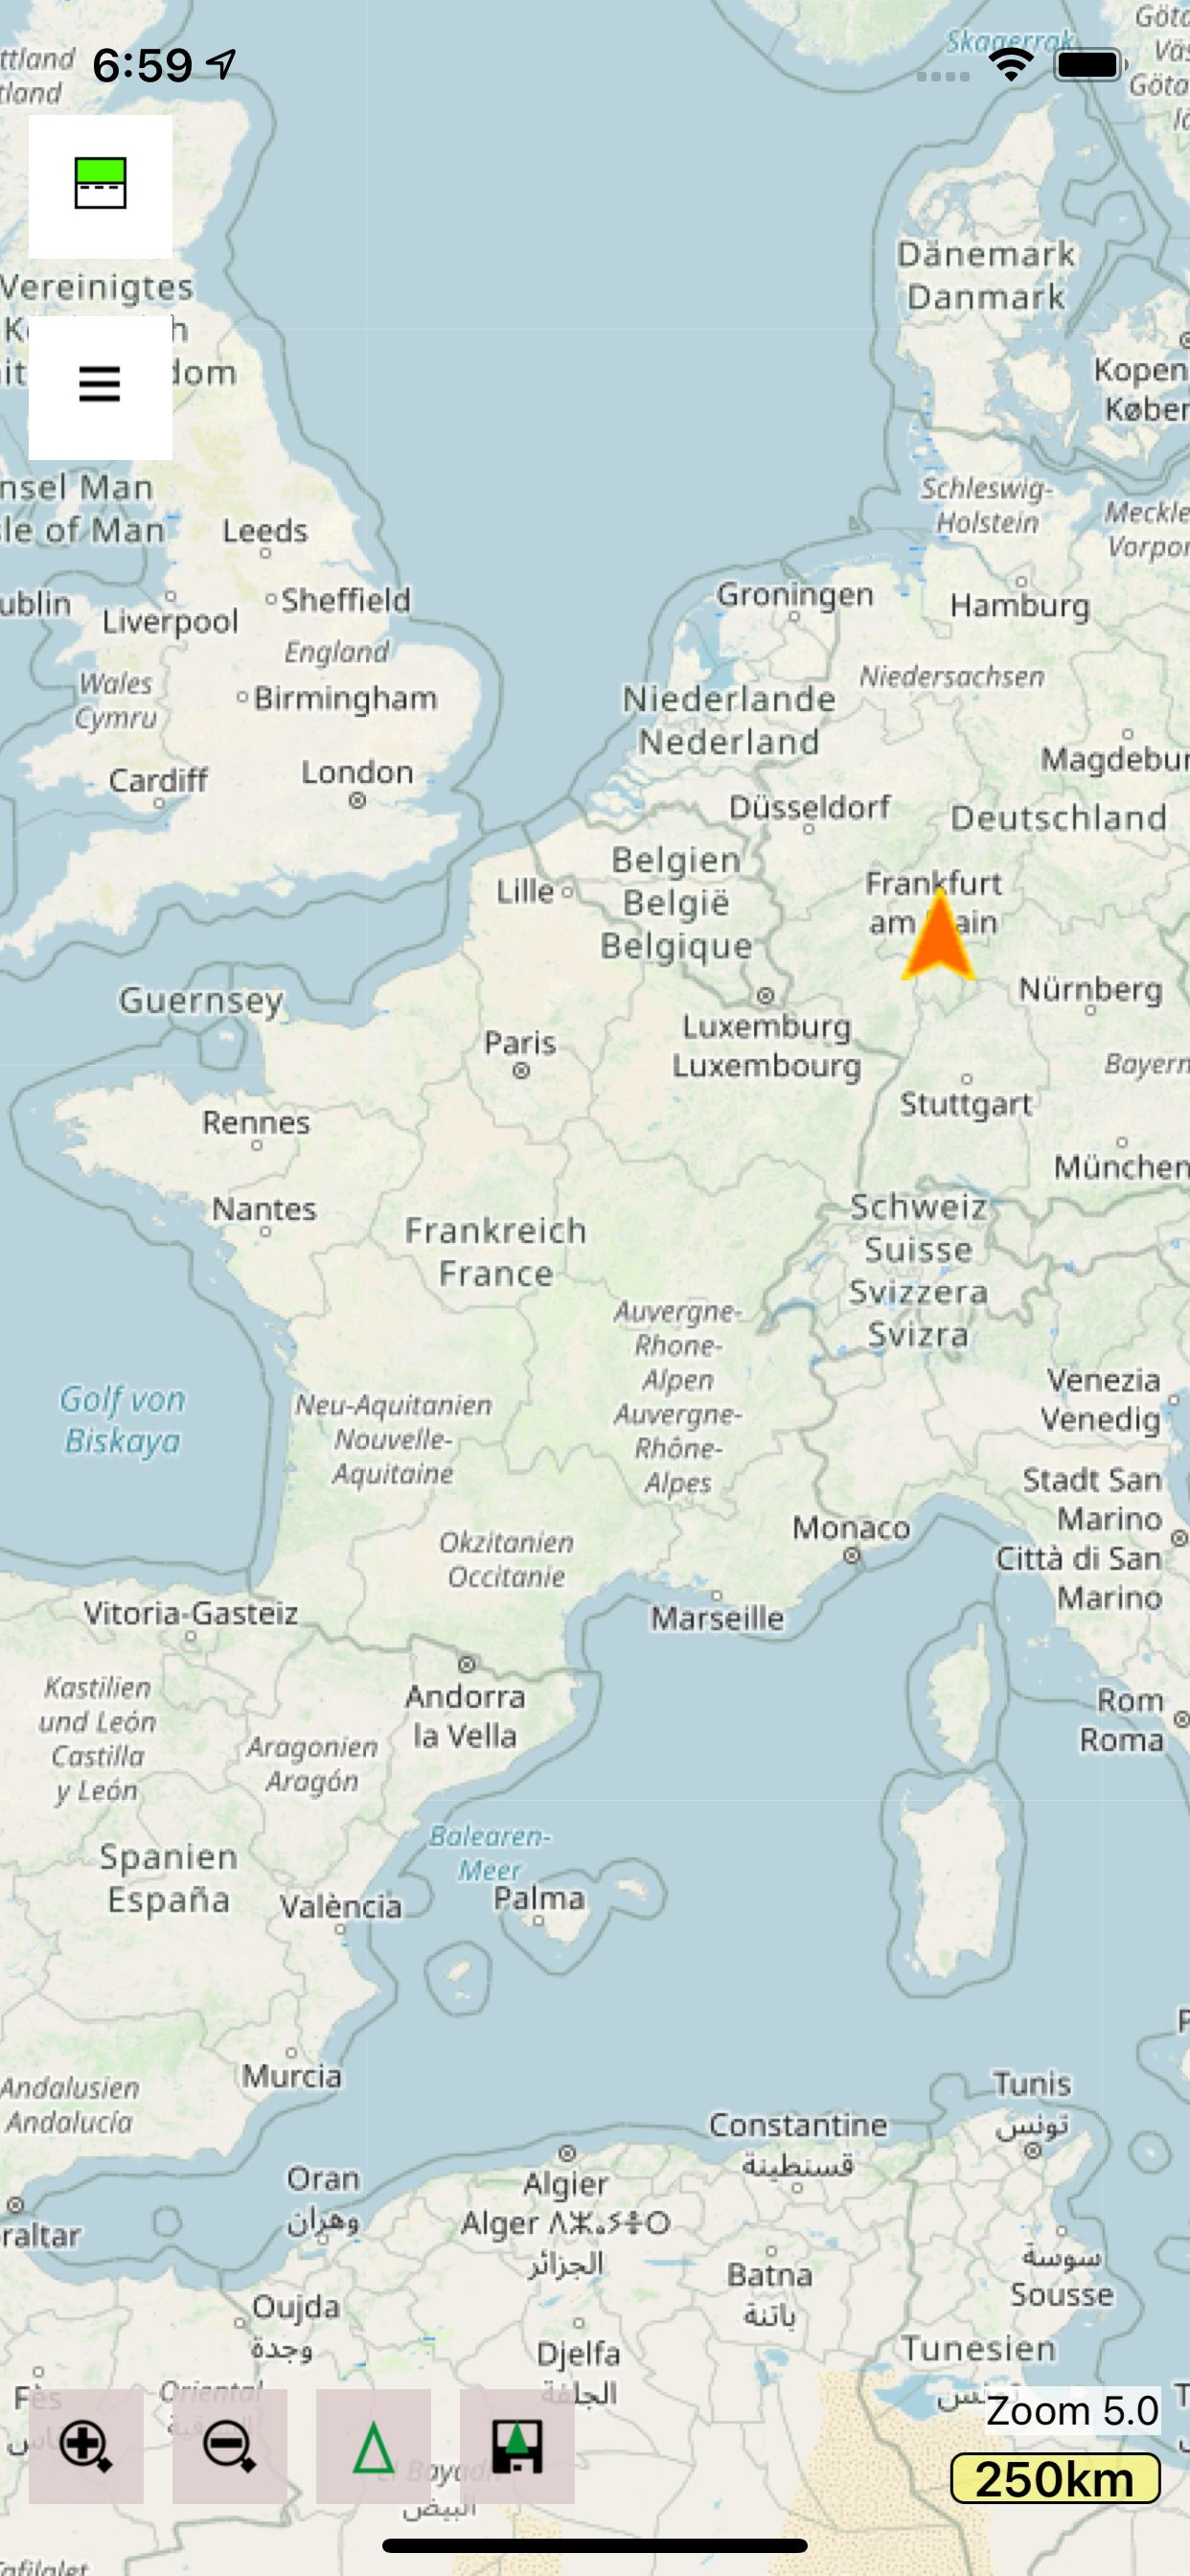
My Location
The map always shows your current location with an orange triangular icon. You can change this icon in the settings.
At the bottom left of the map is the Center my location button, which can have different states:
 | The current location is centered in the middle of the map and is also always automatically kept in the middle when moving. Tap the button to turn off the automatic centering. |
 | The current location is currently not centered in the middle of the map, but will be automatically centered again in the next 20 seconds. You can change this interval in the settings. Tap the button to center the location immediately. |
 | The current location will no longer be centered automatically until you tap this button again. |
 | The current location is currently unknown, e.g. in a building or a tunnel if the device has no GPS reception. |
Tapping the Save button  will save the current location as a new waypoint in your database.
The Compass button  lets you toggle the orientation of the map between “North up” and “Heading up”.
Cursor
The cursor is a useful marker in the map which can be set just by tapping on a specific location. It is then indicated with Cursor  symbol.
Tapping on the cursor opens a menu with several options, like Save, Directions etc.
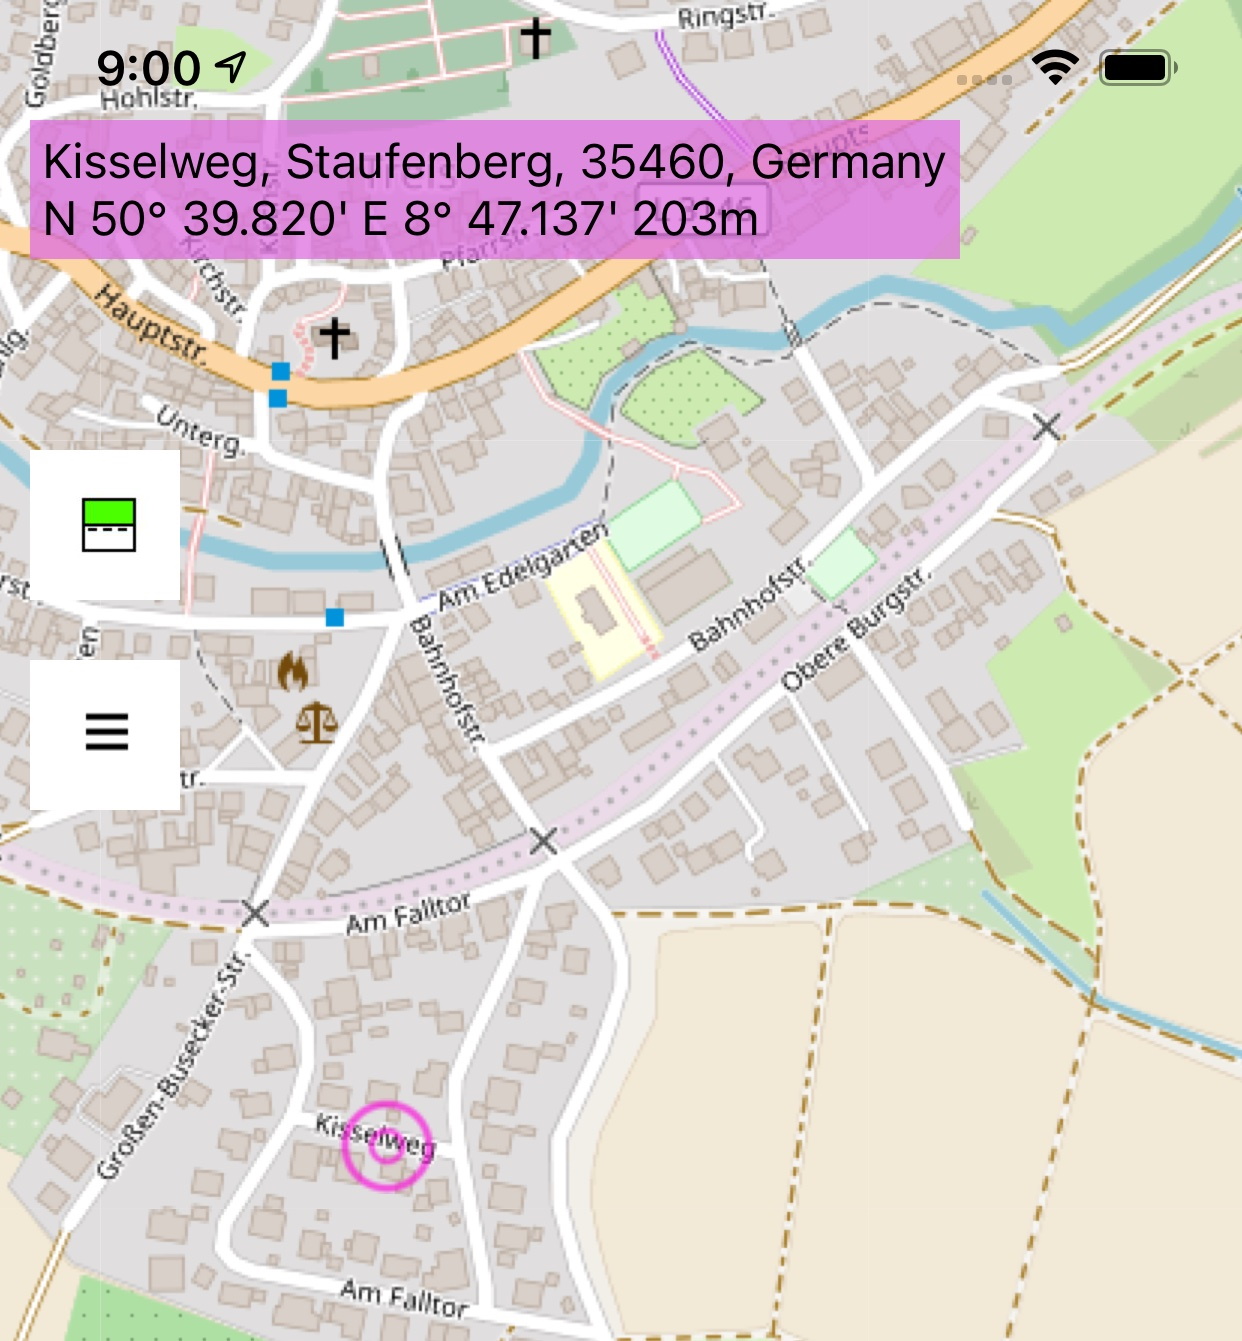
When Cursor Info is activated in Main menu , all the information available about this point is shown in the magenta cursor information box:
Properties
Every waypoint, track, route and POI has properties, which you can open from the pop-up menu. Depending on the type of element, different information is given:
Waypoints, POIs
 | 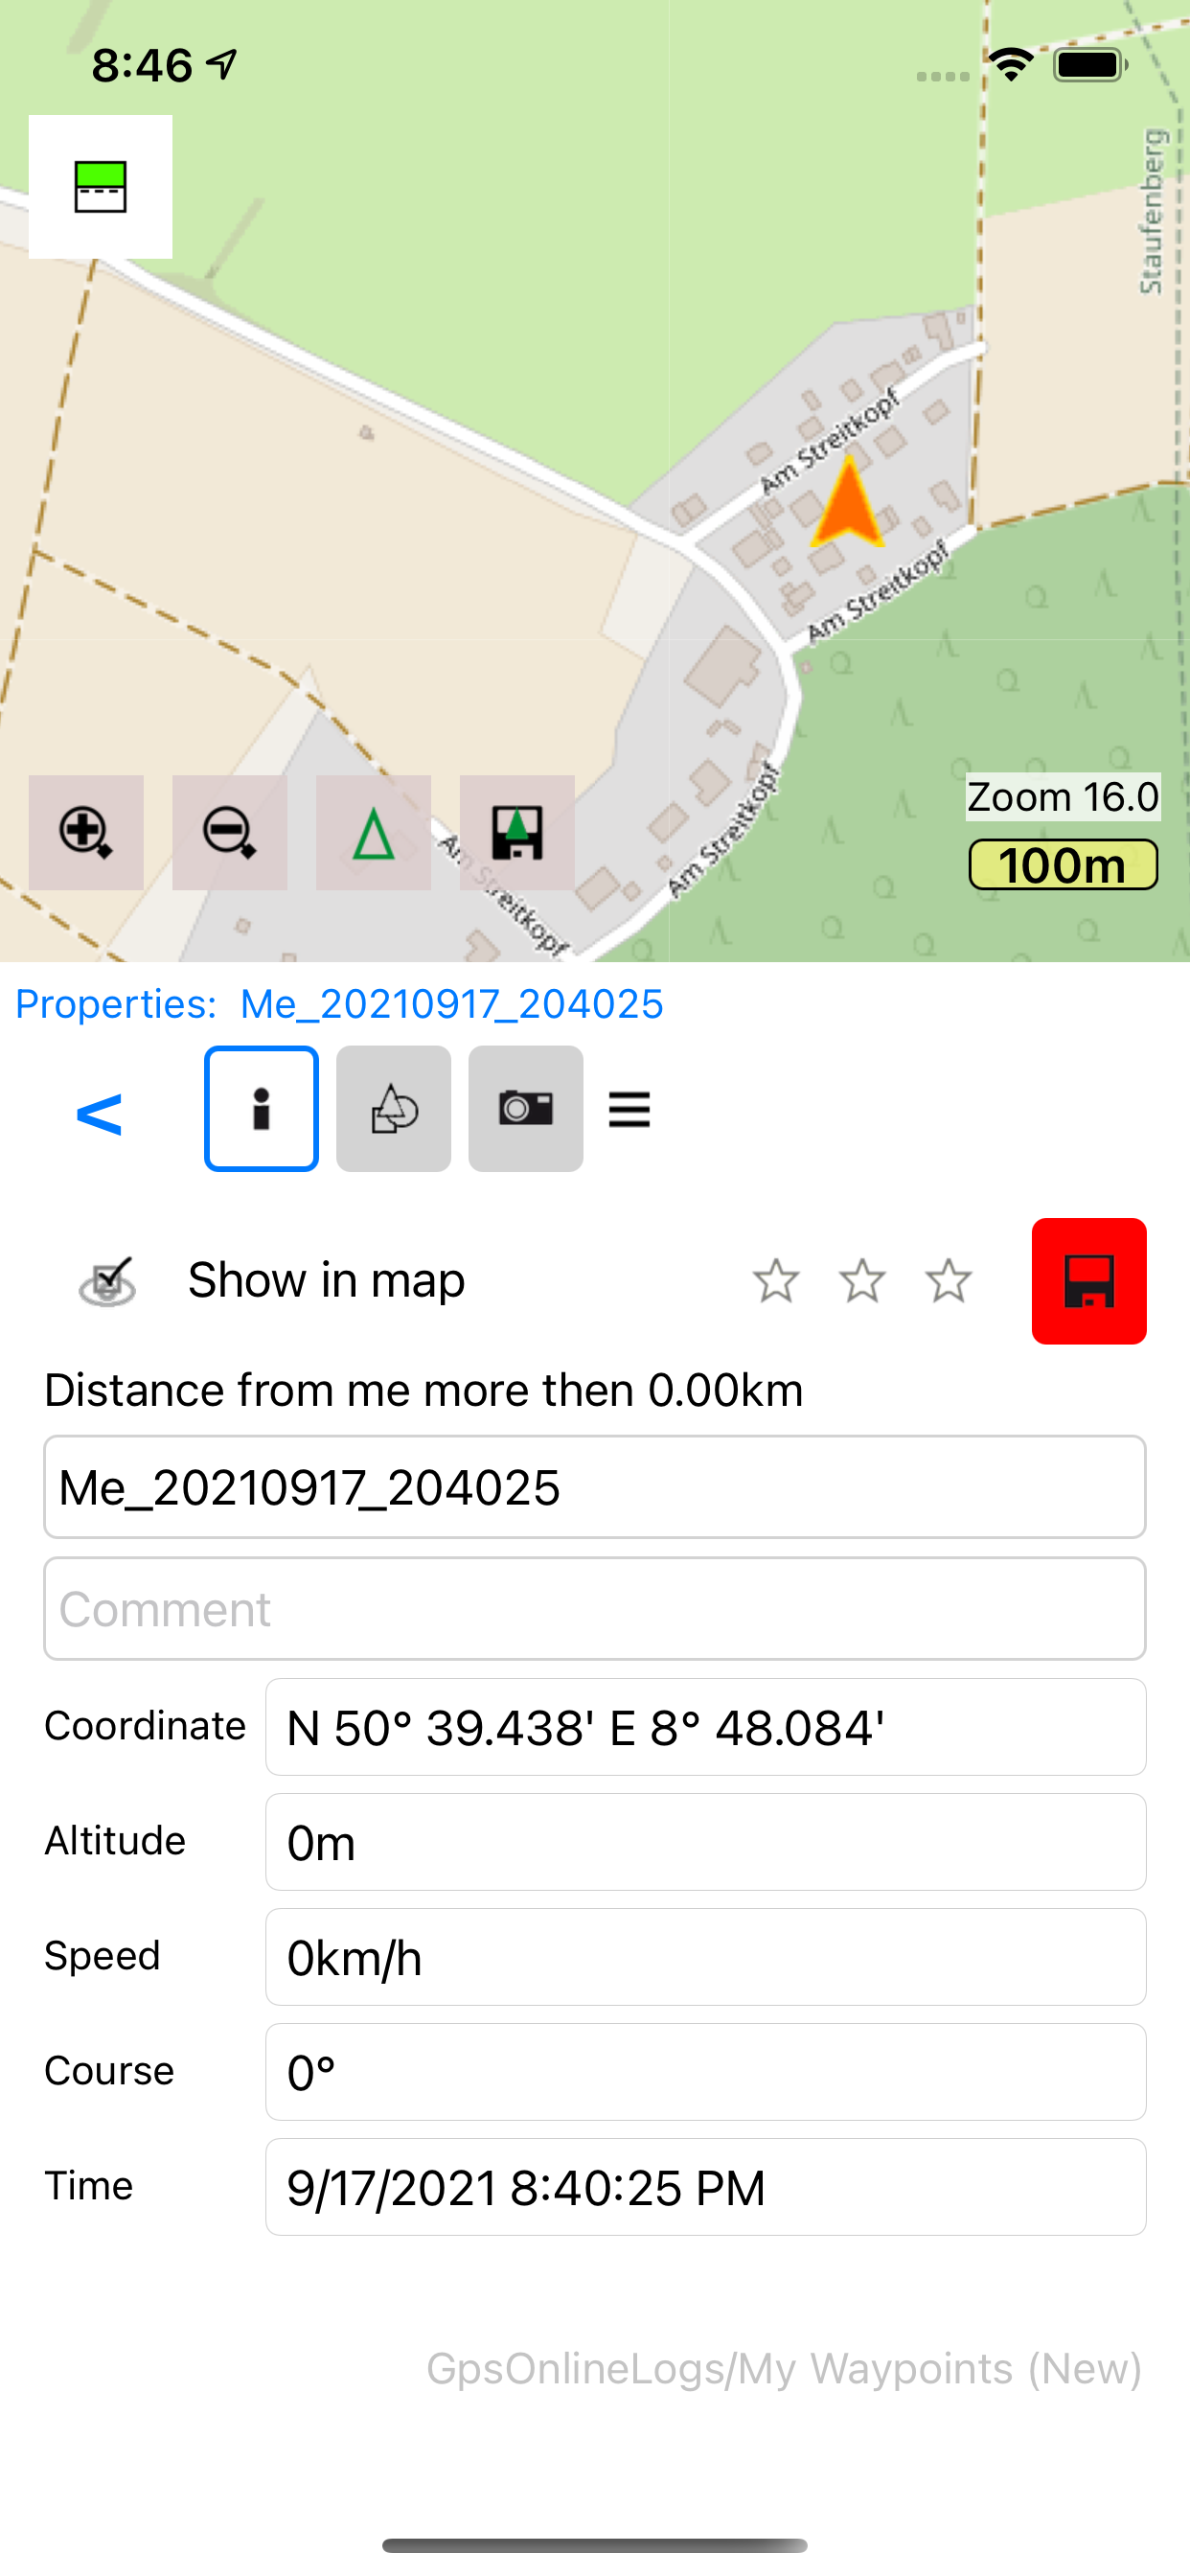 | Shows and edits Name, Comment, Rating etc. Note that you have to tap Save  when you change Name or Comment. With Show in map check box, you can remove or load the element on the map. To delete it, use Delete from the Options menu when you change Name or Comment. With Show in map check box, you can remove or load the element on the map. To delete it, use Delete from the Options menu |
 | 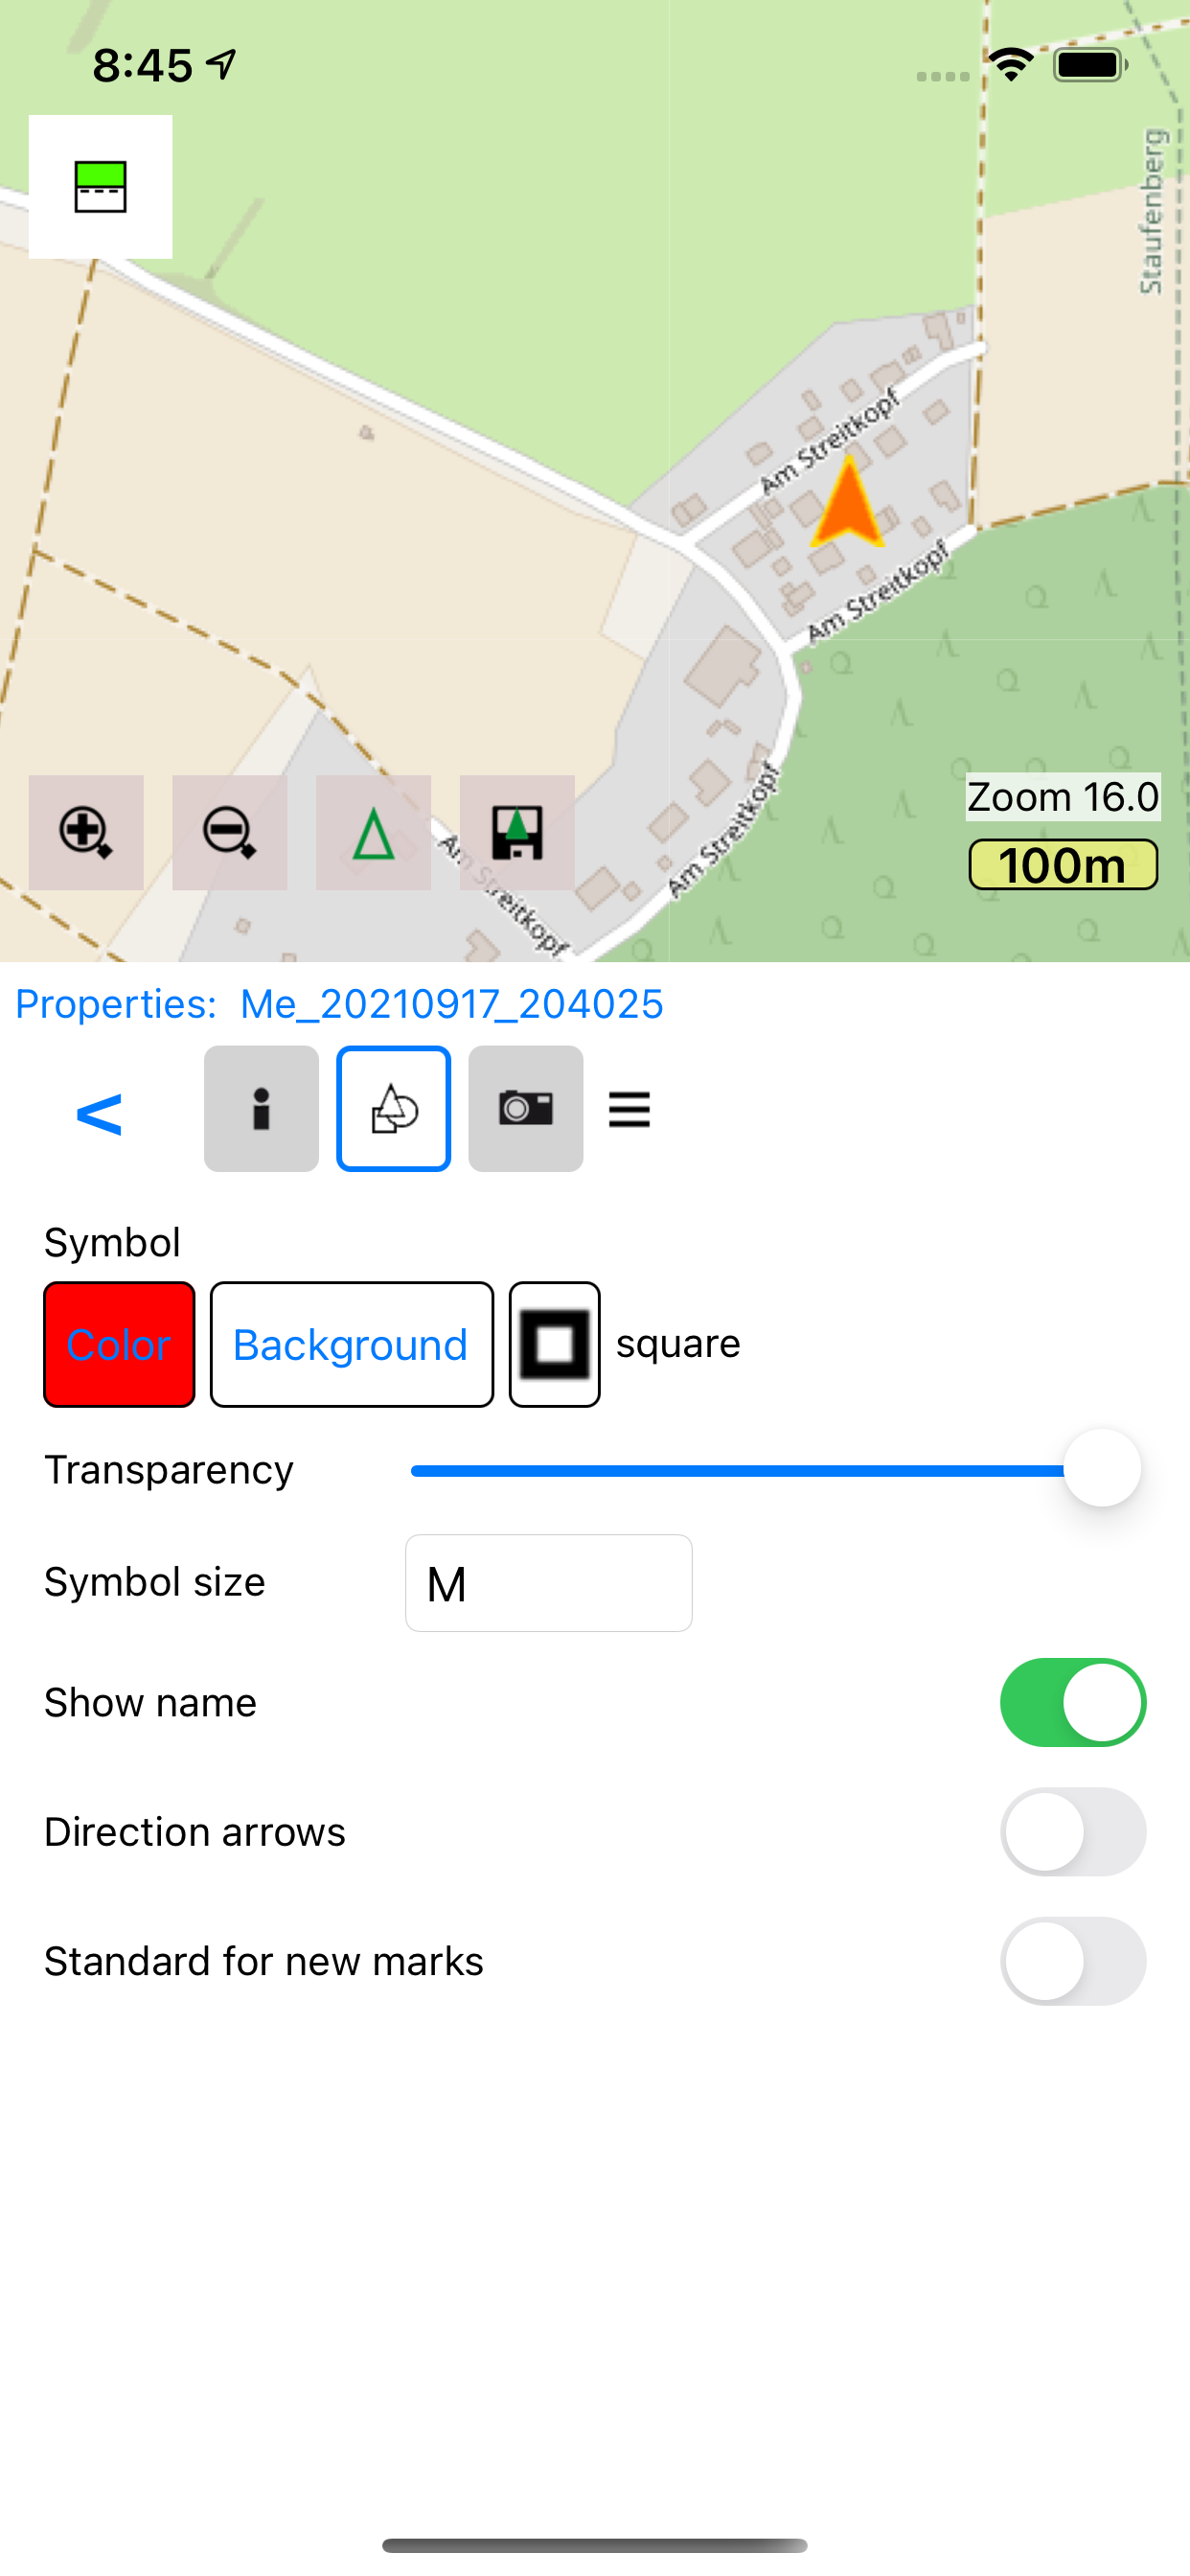 | Shows and changes style, color and symbol, changes are immediately saved and reflected in the map |
Routes
The pages of the Route properties are explained in detail in the chapter Route planning, see there.
Tracks
| | 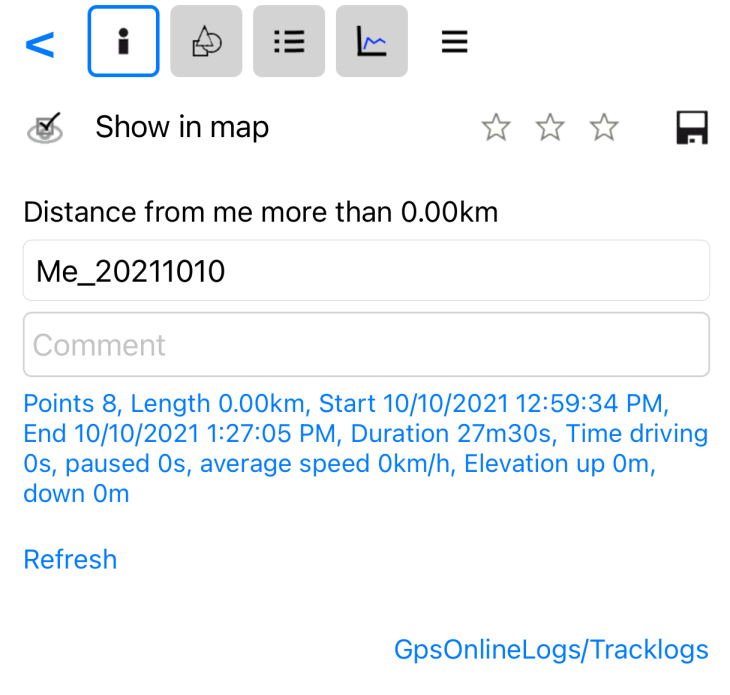 | Shows and edits Name, Comment, Rating etc. Note that you have to tap Save when you change Name or Comment. You also see statistics like length, duration etc from the track. With Show in map check box, you can remove or load the track on the map. To delete it, use Delete from the Options menu. |
| | 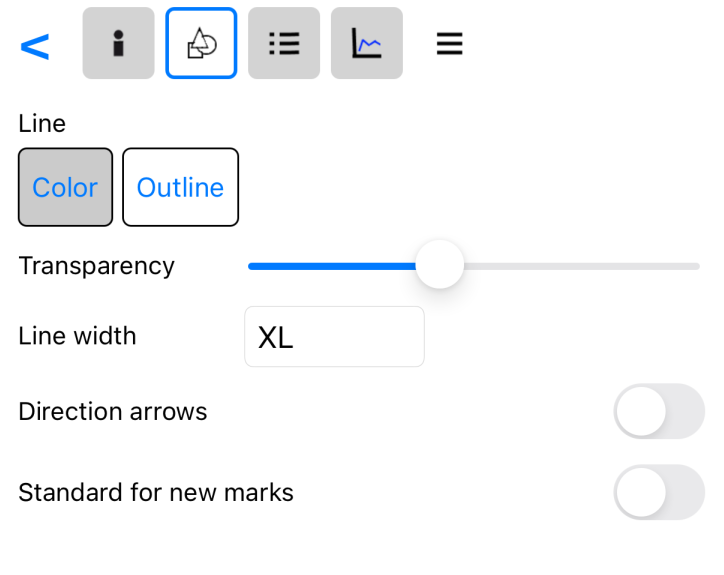 | Shows and changes style, color and symbol, changes are immediately saved and reflected on the map |
 | 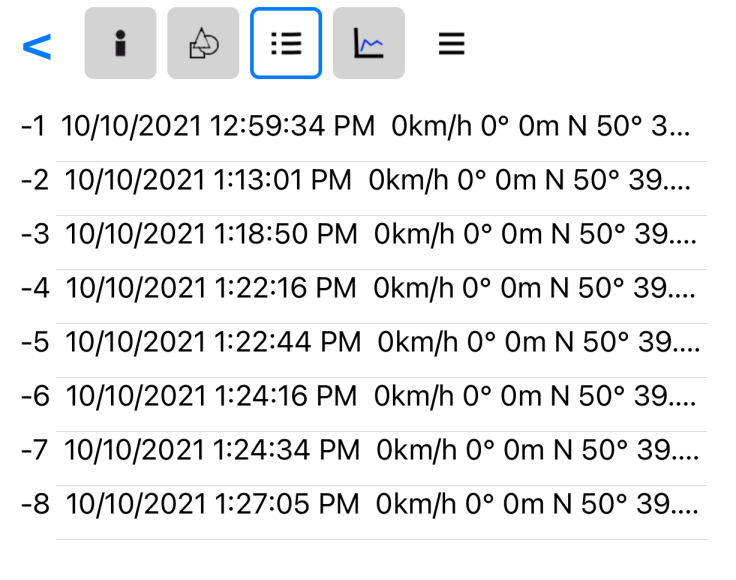 | Here you see all trackpoints of the track. |
 | 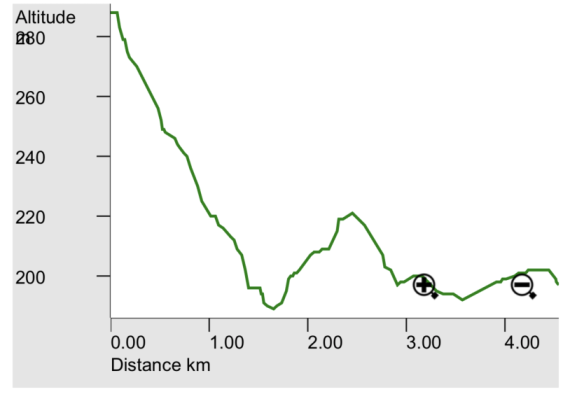 | This is the elevation diagram, it shows the elevation at each point of the track |
| |  | More options you can do with the track |
Maps
| | 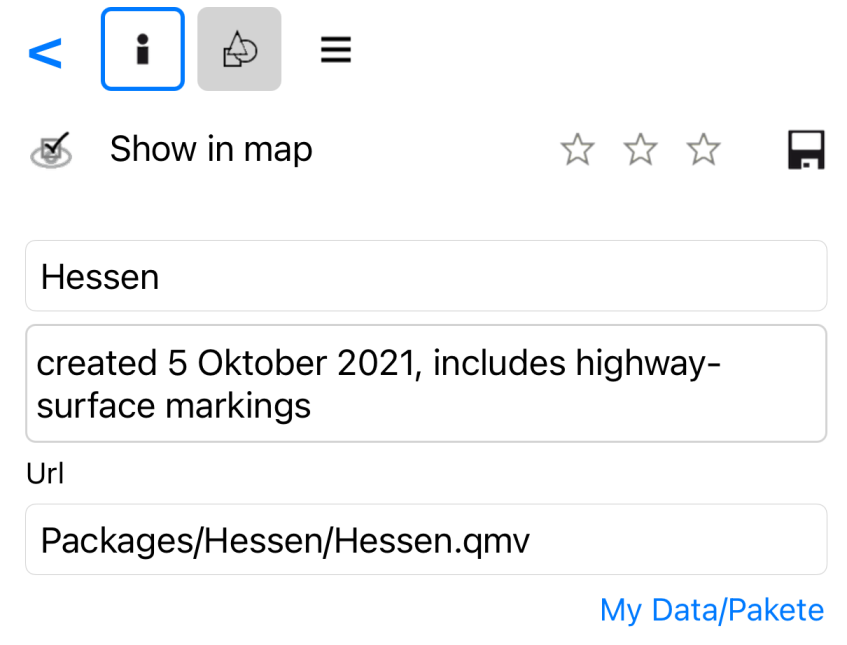 | Shows and edits Name, Comment, Rating etc. Note that you have to tap Save when you change Name or Comment. With Show in map check box, you can remove or load the element on the map. To delete the map, use Delete from the Options menu |
| | 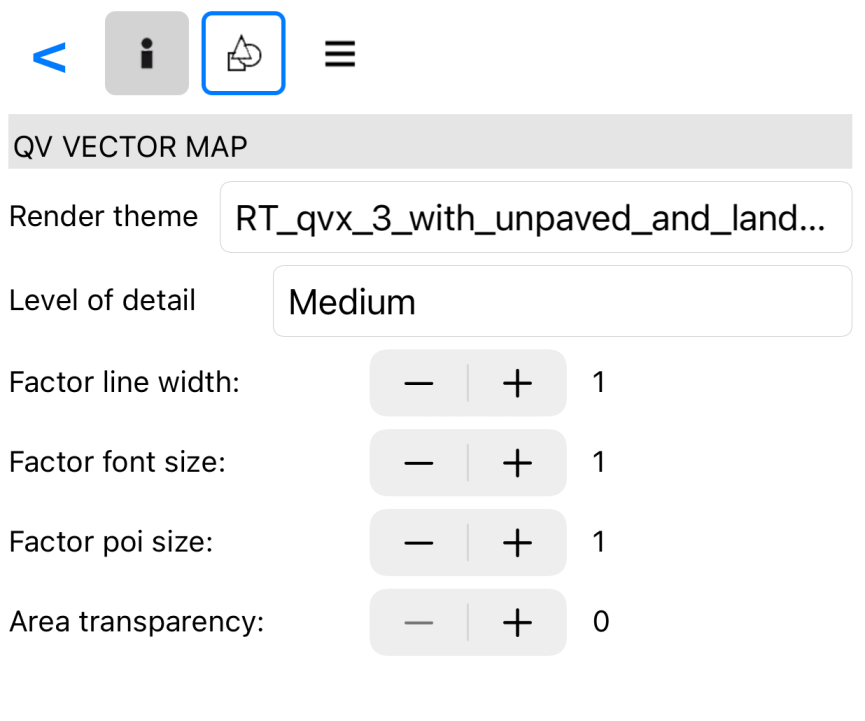 | Here you can adjust the look-and-feel of offline maps, like the width of the roads, the size of the POIs etc. |
Navigation
QVXM will guide you to your destination or along your route. Tap on the waypoint or on the route or just on a point in the map and select Directions from the pop-up menu to open the Directions Task:

You see the proposed route, length and duration and you can still change the route options. When ready, just tap on the green Start  button and navigation starts:

While navigating, all other buttons on the map are hidden. To activate them again, just tap on the map. To stop navigating, just tap the red Stop  button.
Tapping on any of the yellow information boxes opens a pop-up menu with more options like Stop, Recalculate etc.
Share
You can share your Waypoints, Routes and Tracks with other users. Open Properties of the item you want to share and select Share from the menu :
There is three options, depending with whom you want to share.
- Share with any app - the item will be exported as a standard GPX-file, which you can use with any app understanding GPX, note that GPX is limited to the basic information like name and coordinates. Colors or route options are not included in GPX.
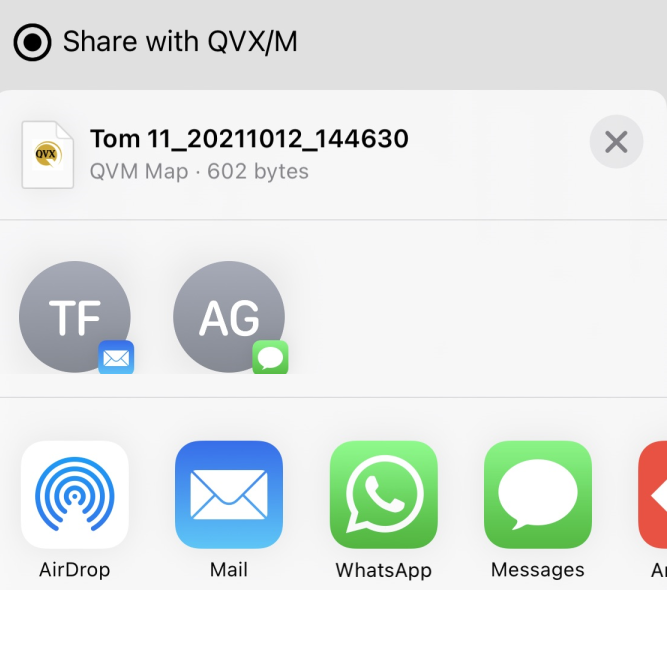
- Share with QVX/M - the item is exported as a QMP-file, which only QVX and QVXM understands. So use this only, if you want to share with an other QV user.
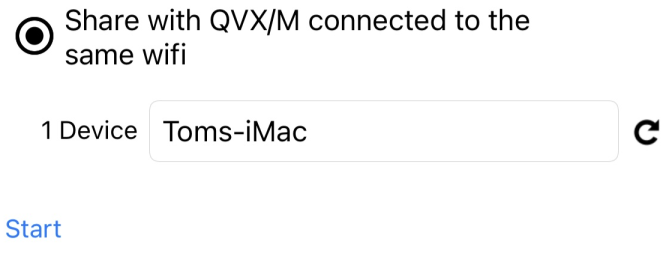
- Share with QVX/M in same Wifi - same as option 2., but the file is immediately send to the other device with QV-NetDrop.
After selecting the option, tap Start.
With option 1 and 2 the Share page of your device is shown and you can choose, if you want to share with WhatsApp or Facebook or email etc. depending what you are using on your phone.
With option 3 the QV-NetDrop page is shown, where you select the destination device.
Receiving shared
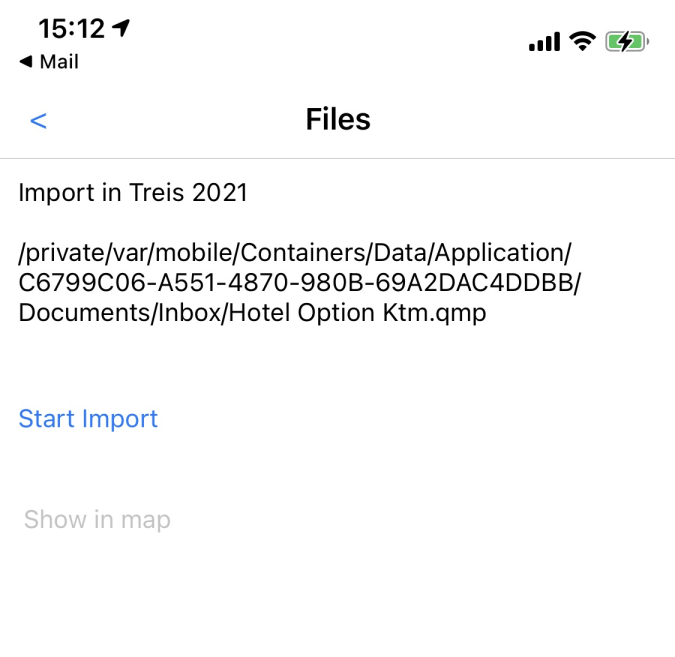
When someone shares routes, waypoints or tracks with you, you will receive a message which includes a file. Open that file and select to open with QuoVadis X Mobile.

Next in QVXM tap on Start Import and then Show in Map:
Tasks
Search Task
In Search Task  you'll find addresses and POIs, online and offline, and also waypoints, routes, tracks and maps stored in your databases.
Just type in what you are looking for and QVXM will search as you are typing:
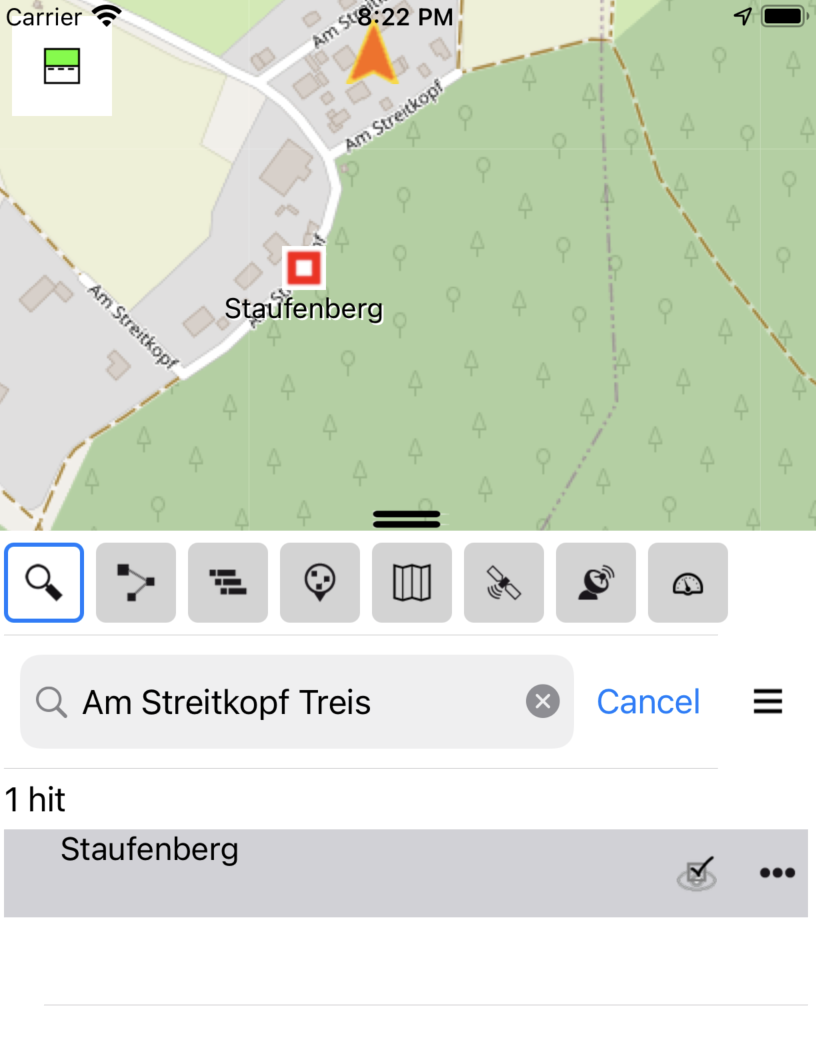
Tap on a found item to see it temporarily on the map, check the checkbox to permanently load it into the map. Tap on Options  to open all options with this item:

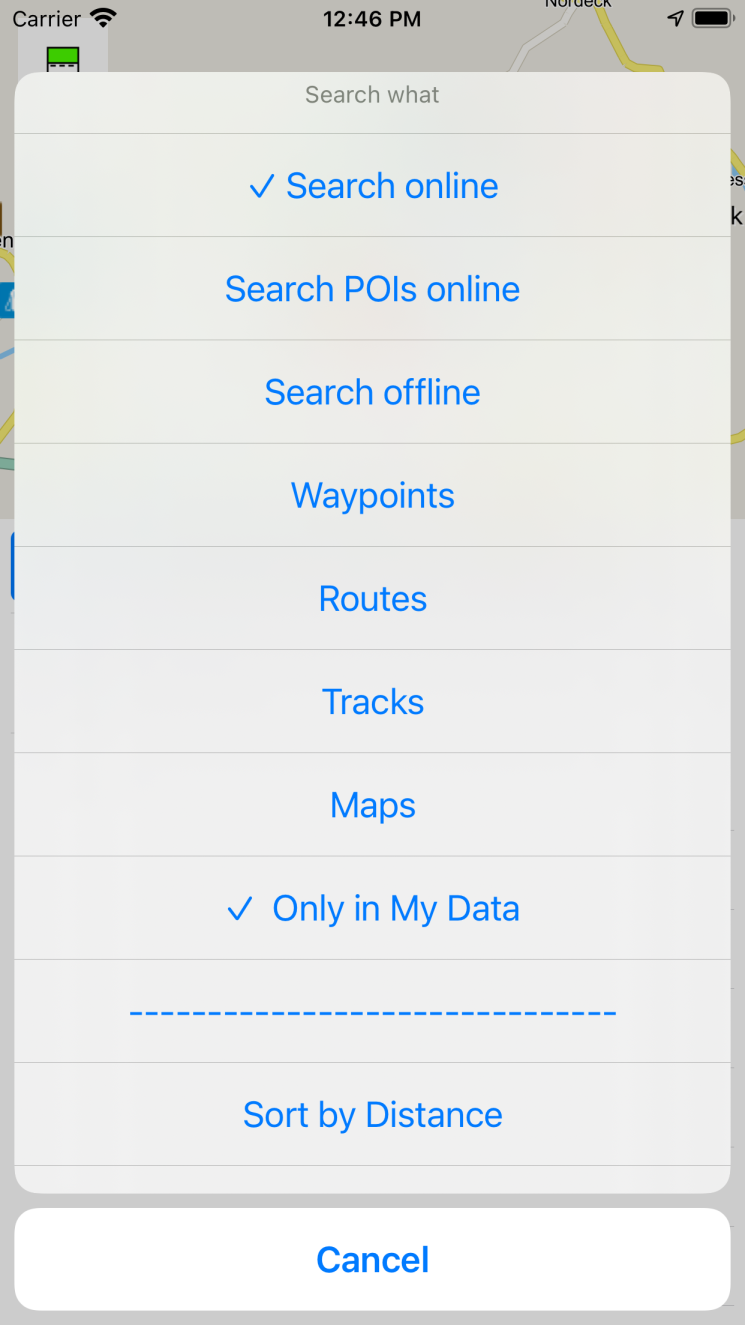
With the Menu button you can select what you want to search - online addresses, online or offline POIs, or waypoints, routes, tracks in your databases.
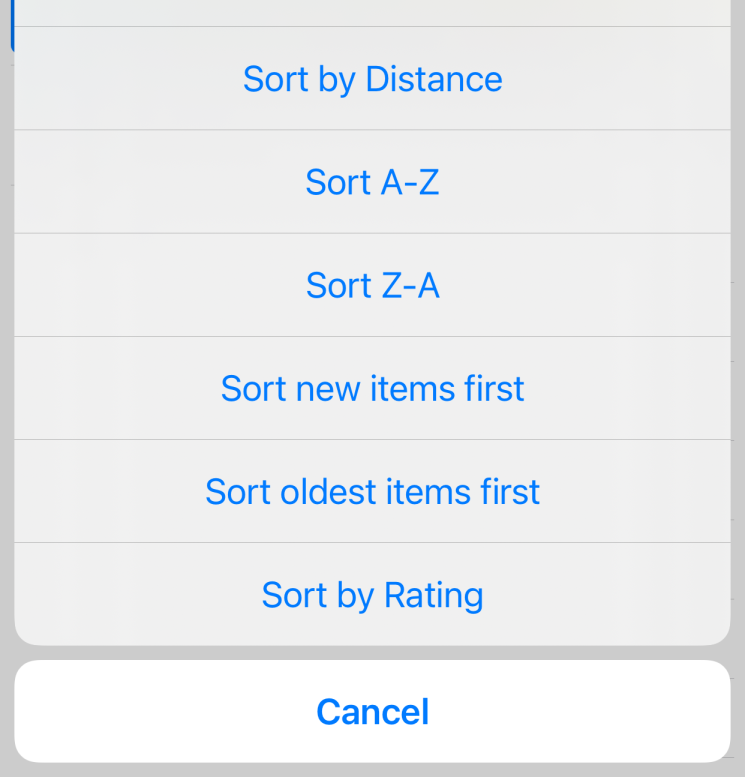
You can also sort the resulting list by various parameters:
Route Planning Task
Manage and edit your routes
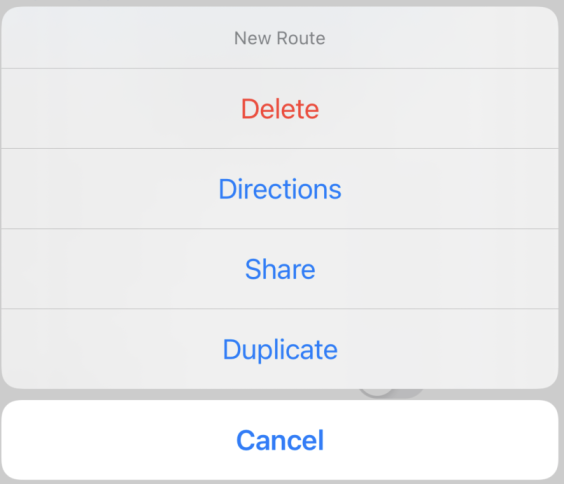
Route Planning Task  shows the list of all your routes. Tap on one route to see it on the map. Select Edit from the Options menu to see and edit all the properties.
Create a new route
There are two ways to create a new route:
- tap Plus
 button
 - select Start new route from the menu of any waypoint, POI or the cursor on the map
To indicate that the route editing mode is now on, the route button will turn green: 
In both cases the properties of the new route is opened and you can start working with the route:
 | 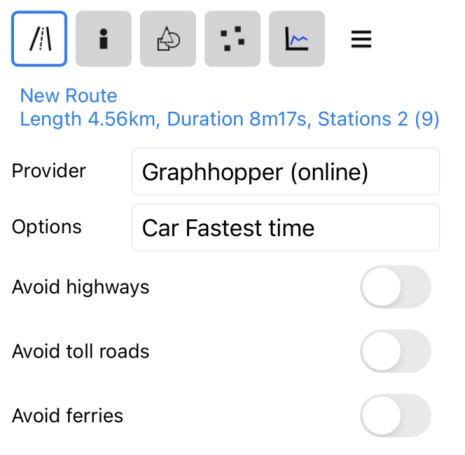 | Shows current length of the route, and you can change all routing options. We offer several routing providers for your choice, most online like Google, Bing and Graphhopper but also offline routing. Please refer to chapter Routing options for a complete description of all the options and also please see Downloads for more information on offline routing. |
| | 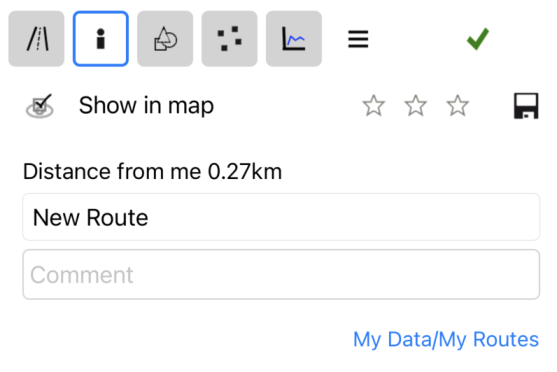 | Shows and edits Name, Comment, Rating etc. Note that you have to tap Save when you change Name or Comment. With Show in map check box, you can remove or load the route on the map. To delete it, use Delete from the Options menu |
| | 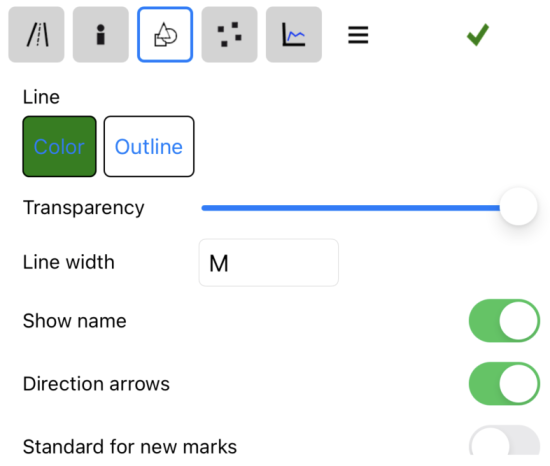 | Shows and changes style, color and symbol, changes are immediately saved and reflected on the map |
 |  | Here you see all the navigation instructions on the route. |
| | | This is the elevation diagram, it shows the elevation at each point of the route |
| | | More options you can do with the route |
 | You should tap “OK” when you are done with editing your route. This will remove “Add to route..” from all menues. To indicate that the route editing mode is now off, the route button will now be white again |
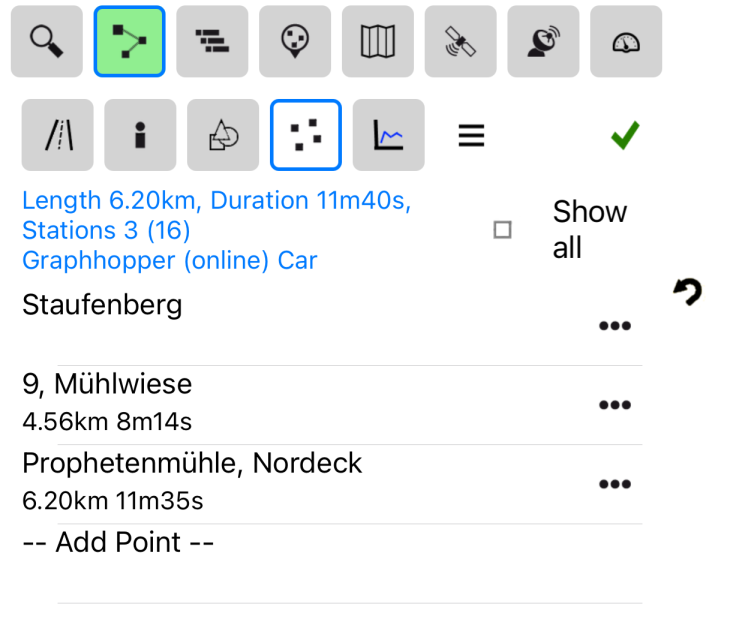
Add points to the route
There are three ways to add points to the route:
 .
.
First, Tap “– Add Points –” brings you to the Search task. Here you can search for an address, POI, or waypoint. Once found, tap Options and then Append to route…  .
.
Second, if you have already existing waypoints or POIs on the map, just tap on this specific point and again select Append to route… from the pop-up menu.
The third option lets you add any location on the map to the route. Tap on the location on the map to set the cursor there. Then tap again on the cursor to open the pop-up-menu of the cursor. Select Append to route… from the pop-up menu.
In all three cases you will jump back to the points list, the route will be recalculated automatically and shown on the map.
Modify route points
Next to each route point there is Options button.
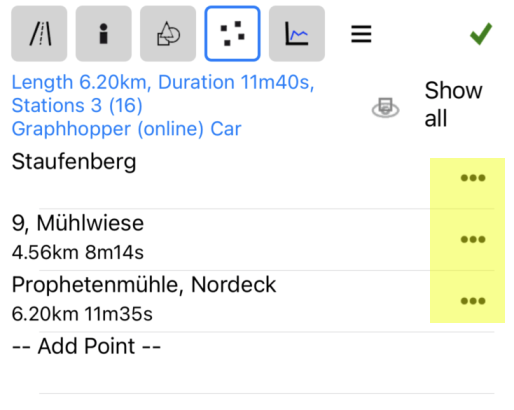
This opens the pop-up menu of that specific route point:
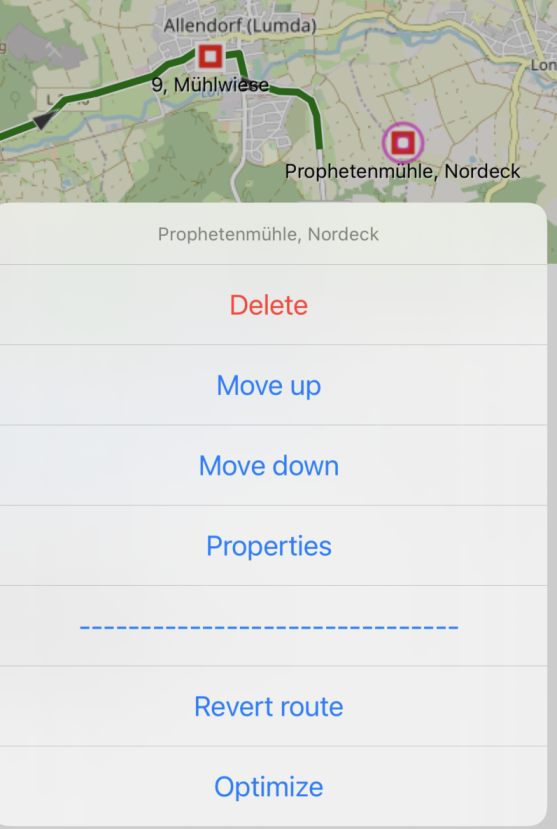
Here you can change the point position in the route with Move up/down, remove the point from the route with Delete and also open Properties to rename the point or to give it another color or symbol.
Project manager task
Project manager task  gives you an overview of all maps, waypoints, routes, tracks and POIs which are currently loaded on the map:
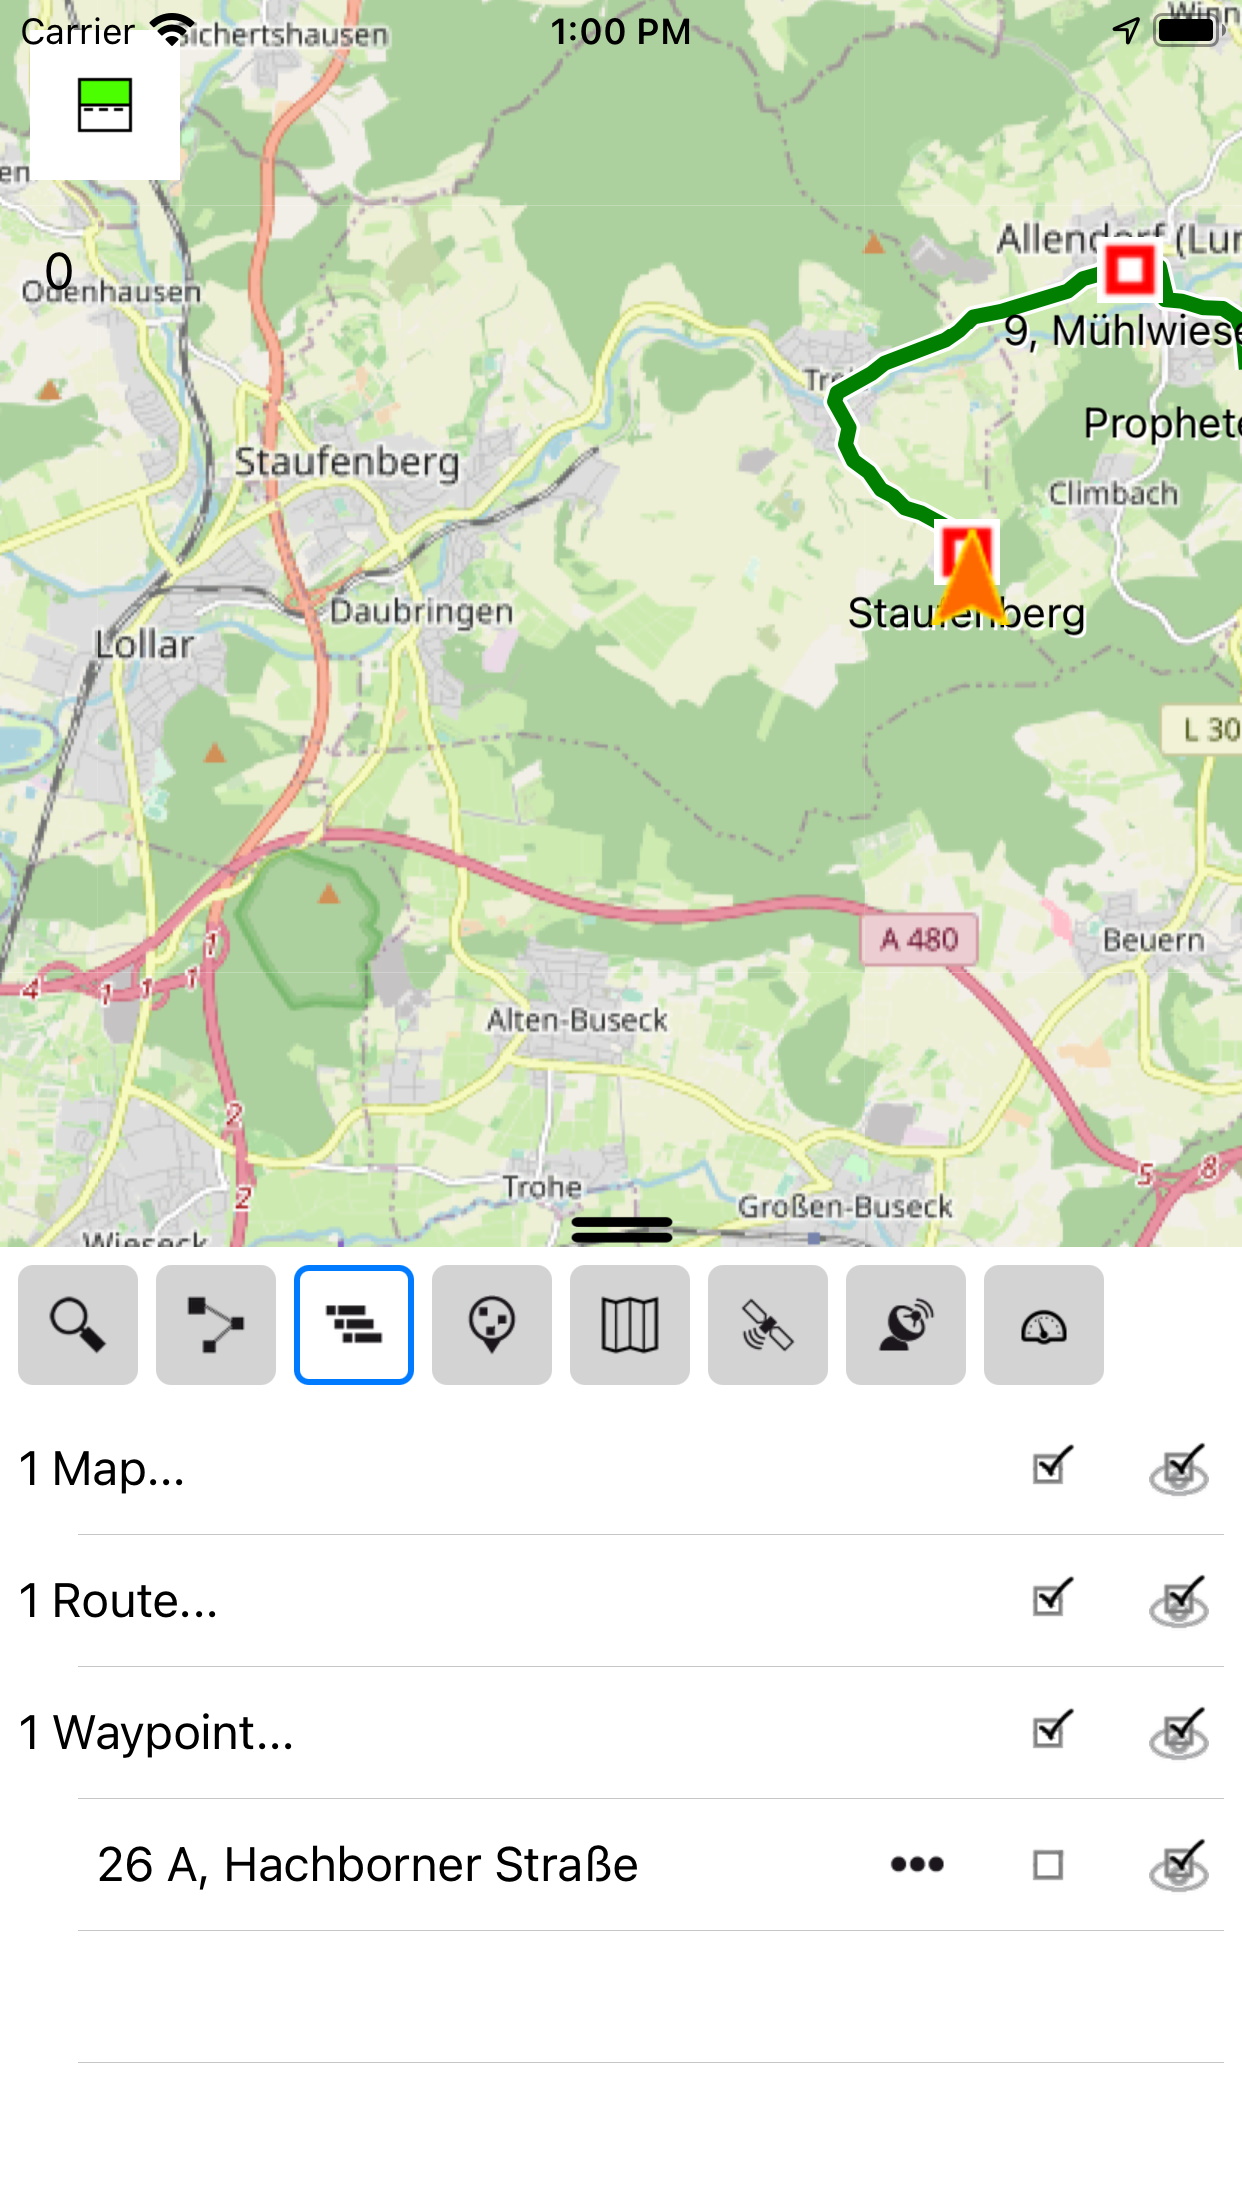
Next to each item there are three buttons:
| | Opens the menu for this item with more options |
| | Temporary hides and unhides the item on the map |
 | Unloads the item from the map. |
POI task
POI task  lets you have different POI categories (for example, all petrol stations or all camp sites) visible on the map. Just select the checkbox of the categories you want to see.
Additionally you can see a special marking indicating the road surface. Grey dots mean gravel, orange dots sand, red dots soil, and green dots grass. No dots means that the road is ether paved or there is no information about the road surface available.

Note that first you have to load an offline map of the corresponding country for this. Please also refer to chapter Downloads for more information on offline maps.
Maps task
Maps task  lets you load several maps at the same time.
 .
.
You can load up to 9 maps at the same time. To load a map, tap on an empty entry and just select one from the list. To unload a map, tap on the entry and select “-none-”.
Tap on Properties button to open the properties of the map to change some options, see Maps properties.
GPS task
GPS task  contains several subtasks:
| |  | GPS: Gives you basic information like coordinates etc. |
 |  | Tracklogs : Shows the active track log |
 | 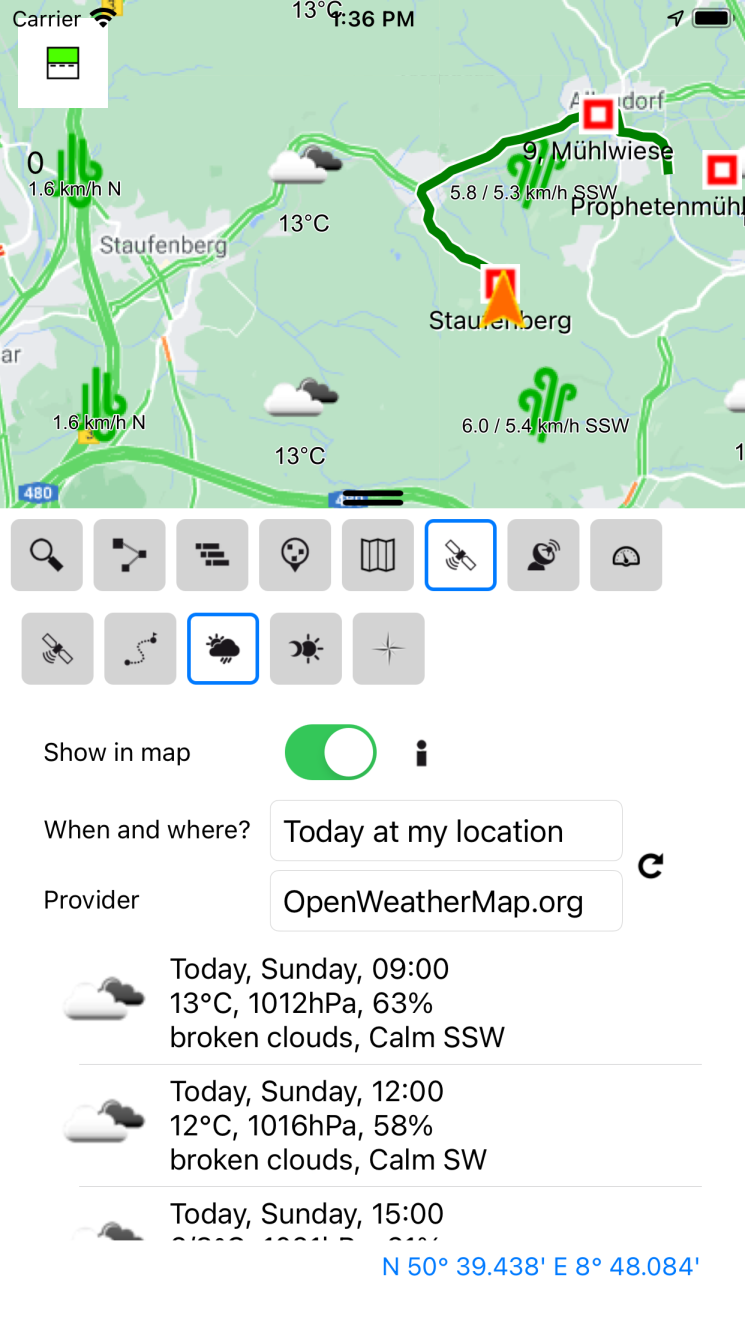 | Gives you the weather information of your current location, the cursor location and can show the weather as icons on the map. |
 | 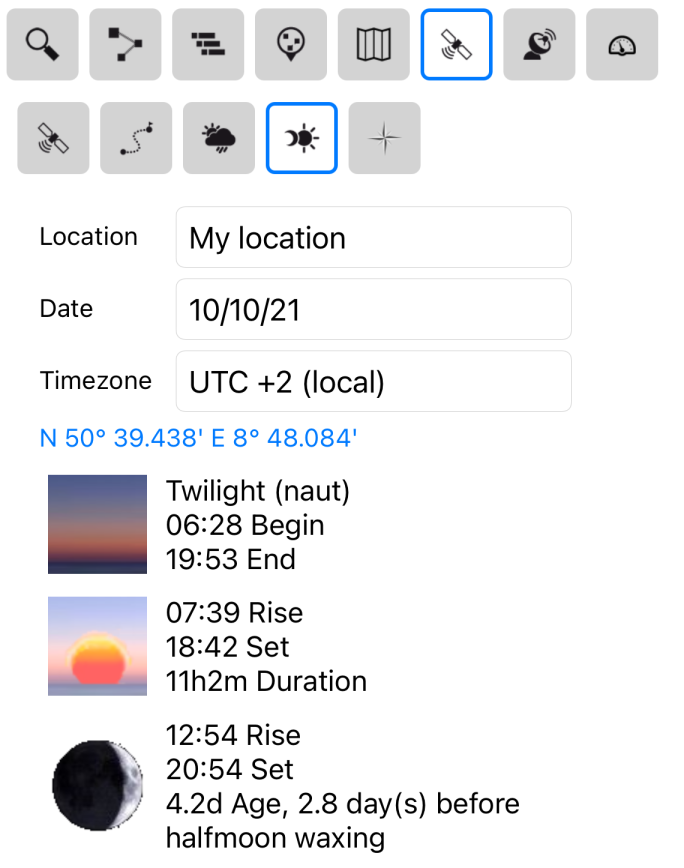 | Gives you the sunrise, sunset and the moon information. |
Live task
Live task  lets you share your location with other QV users, and you can also load the shared locations from them on the map.
 | 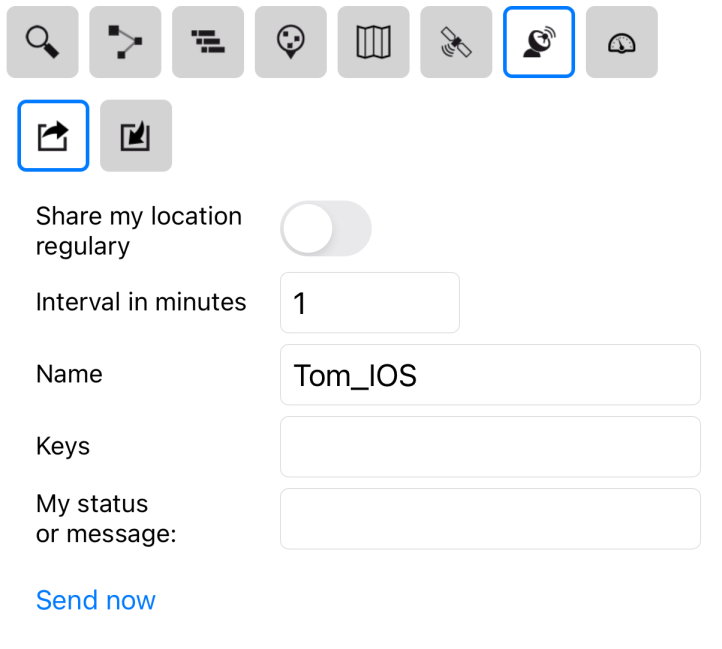 | Shares your own location with other QVX or QVXM users. |
 | 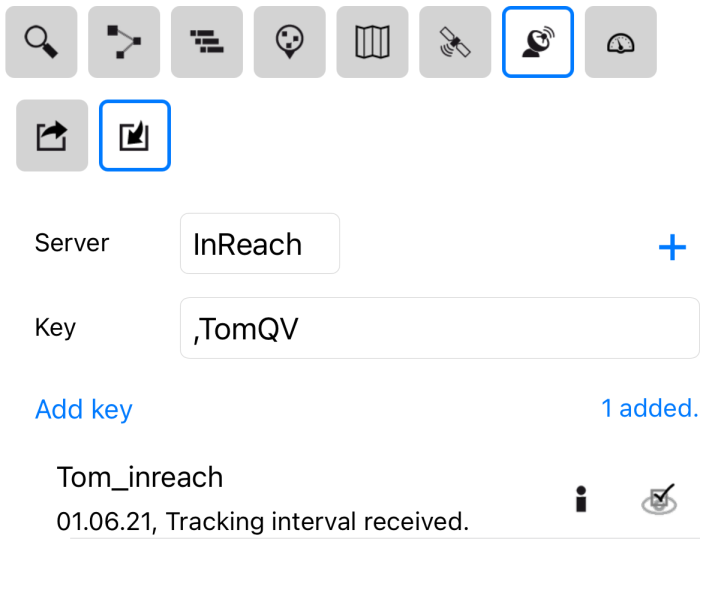 | Loads the shared locations from other QVX or QVXM users. |
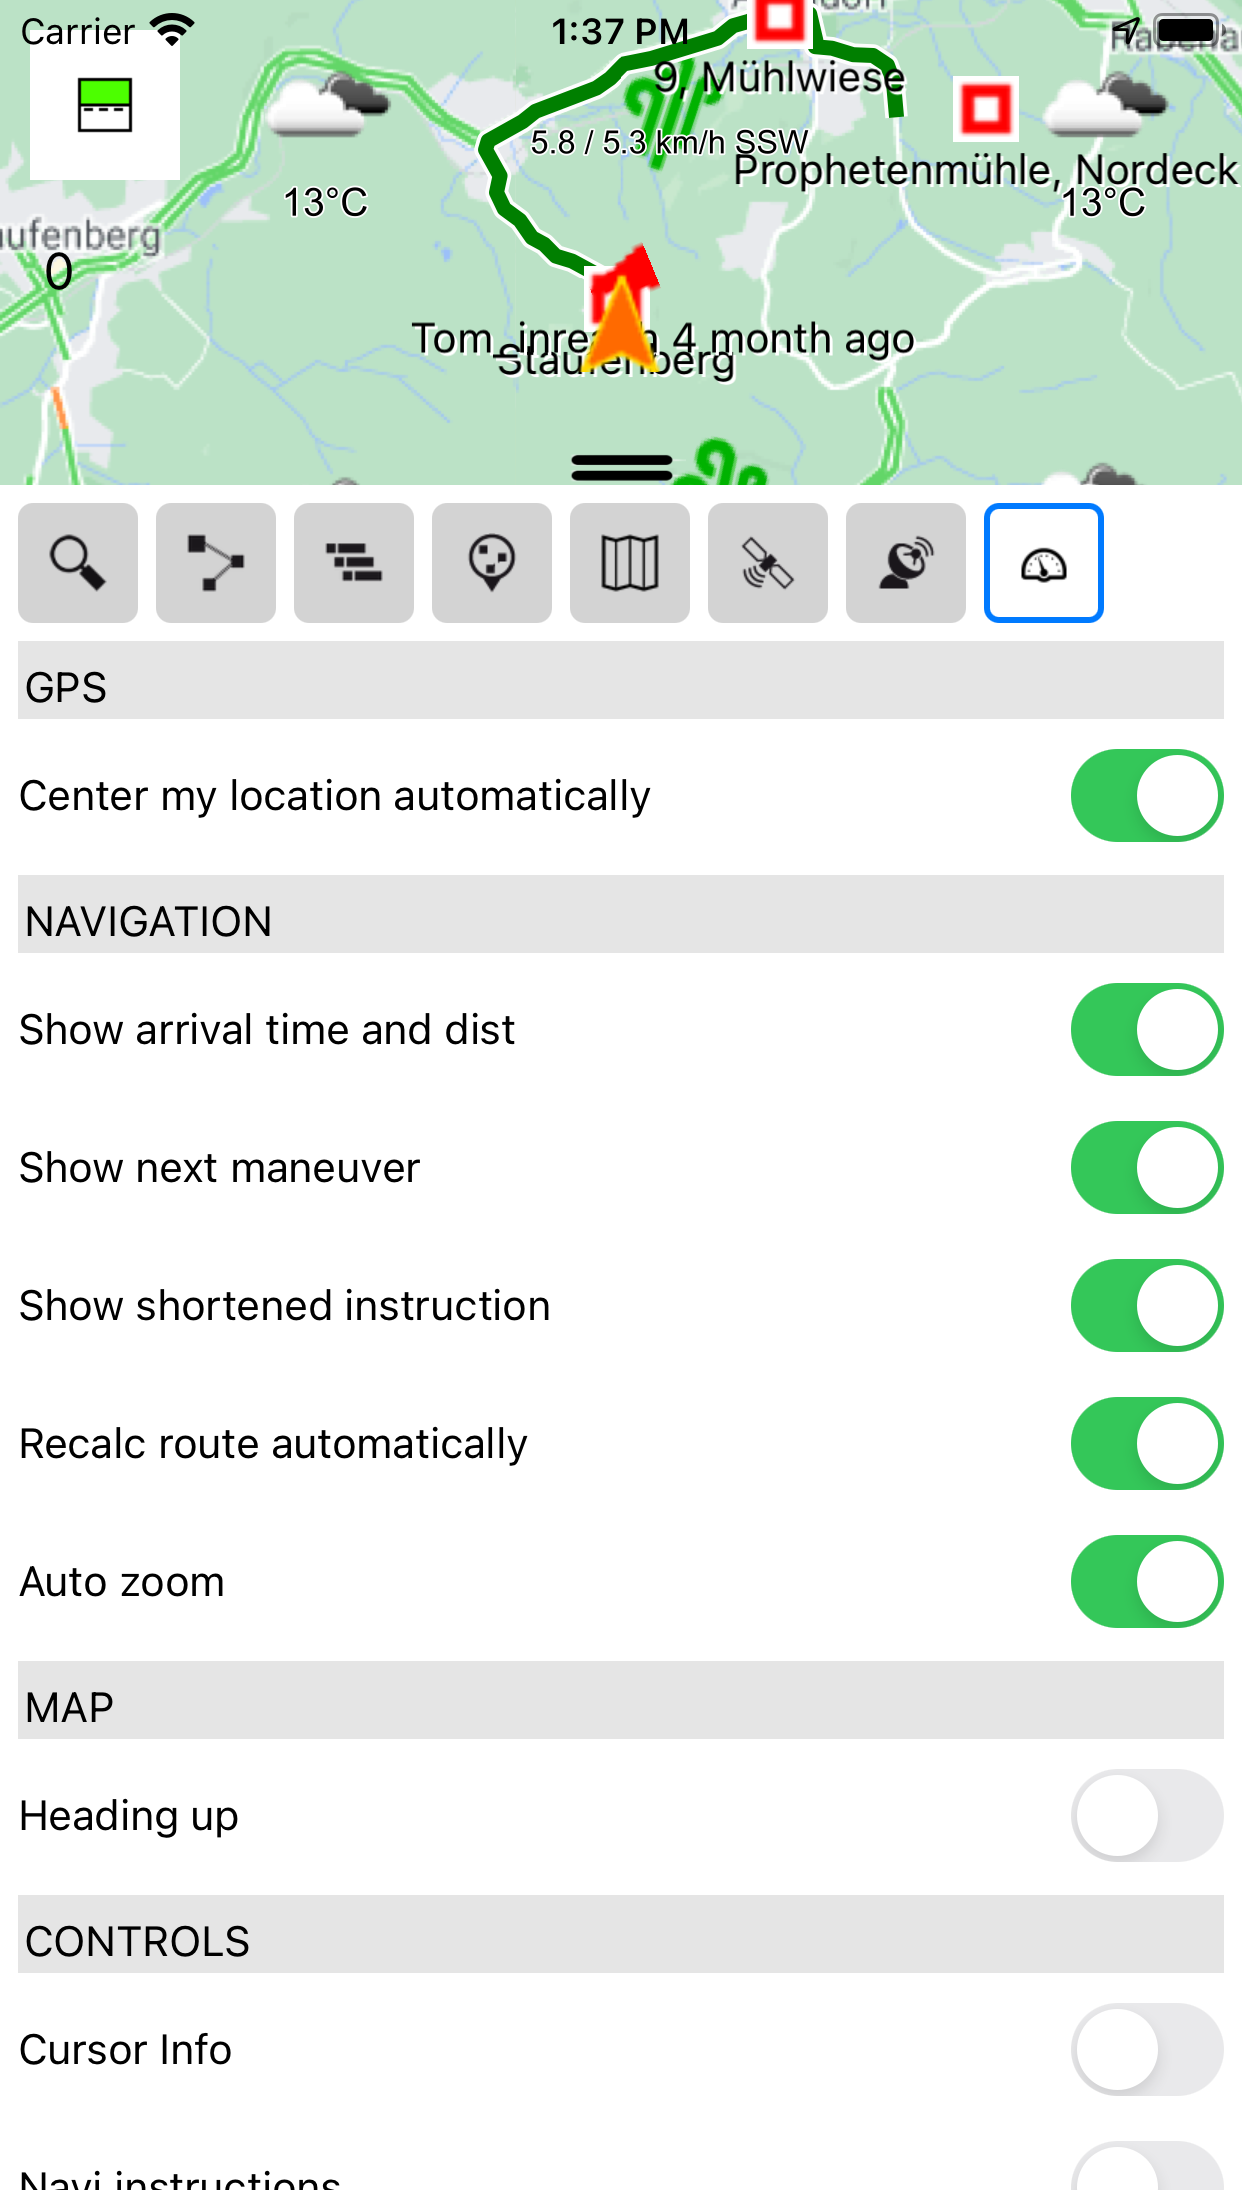
Dashboard task
Dashboard task  lets you configure which elements you want to see on the map.