
Table of Contents
This is an old revision of the document!
Photos
With the Photo function you can manage all your photos in QVX:
- import them into photo tables
- support JPG and RAW formats
- view them quickly with a preview, without necessity to open the original of a photo, which may be stored on the external hard drive
- view them in the original quality if the storage device is connected
- assign location to photos without embedded coordinates, manually or half automatically with the help of a gps-track
- rate them from 1 to 5 stars
- export the selection of photos into a folder, for example for posting on social media
- see all EXIF-tags
- comment and add links
- load them in the Map window to see them on a map
QVX on Mac supports RAW-format, on Windows the free Raw Image Extension needs to be installed from the Microsoft-Store.
Import
As first step you need to import your photos. Click on Import photos  in the Xplorer-toolbar:

Now you can choose either a Folder, then all containing photos including sub folders, will be selected, or single Files, then you can select one ore more photos from a single folder.
You can let QVX create a preview image of selected size on import. Then browsing through the photos will be much quicker and you also don't need to have the device with the photos be connected. Note, that this can take some time, depending on the size and format of the photo.
All photos will be imported into a new database and you can enter the name of the database. Only if you select a photo table in Xplorer Treeview when clicking on Import photos, then the new photos will be imported into the selected photo table.
Click Start Import, when you are done. While the Import is running, you can minimize this dialog and continuing working with QVX.
Browsing photos
After import you'll find the photos in Xplorer in the photo-table:

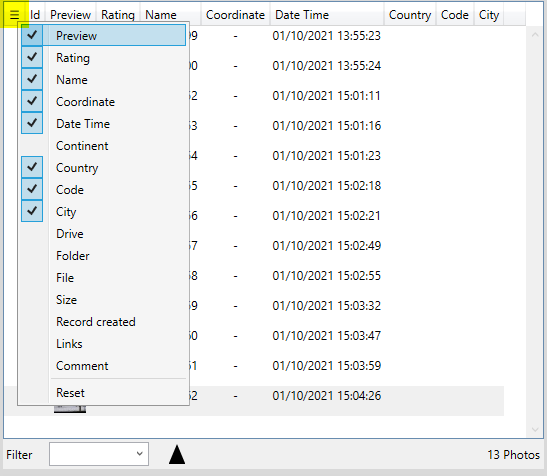
You can select the columns you want to see in the list:
Assigning location
Some cameras and smartphones have a build-in gps, in that case QVX is automatically extracting the coordinates from those photos.
If there are no coordinates in your photos, you have several options:
- manually assign the coordinates by dragging the photo on the map and dropping it at the location where it was taken. With the Move-tool from the Mapwindow toolbar you can edit the location at any time.
- typing the coordinate in the field on the Info-tab
And automatically, when you have a gps-track from the time you where shooting the photos. For this you need one photo with a known location and a track, which was recording during the time when the photos were taken.
So first load the track in the map window. Then select all photos including the one with the known coordinate. And Then select Assign location to photos from the option menu in details:
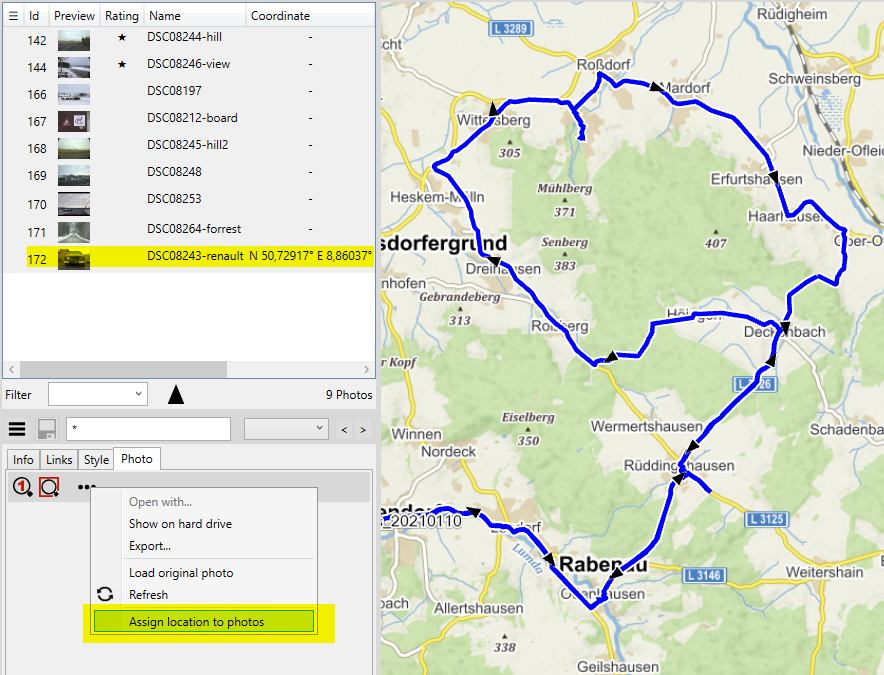
The point with the track is, that we can compare the times of the trackpoints with the time of the photo with the known coordinate to get the coordinates of the other photos. The time difference between the GPS and the camera is the offset and in the dialog we can do a fine tuning now to adjust the offset, if necessary.

While the offset is modified, the location of the photos is re calculated and updated in the map immediately.
Export
Select the photos and click Export from the main toolbar or the options menu in details.

This will copy the selected photos from their original location into the selected folder. Optional continuing number will be added as prefix to the photos and they can also be resized eg. for a post on social media.